SUM and COUNT
You saw in our different Grouping examples above that we counted the occurrences of various CPT codes in a variety of ways – by provider, by date, by provider by date, etc. We did COUNTs using the DBCalc tool. A DBCalc element has three parts:
- What data element is being calculated on (ARCHIVE_TRANSACTIONS.CHARGE, REGISTER.PATNO, etc)
- What type of calculation is being performed (COUNT, SUM, MINIMUM, MAXIMUM, AVERAGE)
- What group(s) the calculation applies to
In the above example, the two DBCalc elements we used had data element = CPTCODE and the type of calculation = COUNT. But the Group was different:
- CPTCODE group – to get a subtotal for each CPT code
- STAFFINIT group – to get individual subtotals for each CPT/rendering provider combination
We also could use no group (i.e. all items) at the bottom, to get a grand total for all CPTs, all providers.
We set the three DBCalc parts by:
- Choosing the data element from the dropdown in the Edit window toolbar
- Setting the type of calculation and group by right clicking on the DBCalc elements and choosing Calculations
The type of calculation to be performed depends on what the data element is:
- COUNT reflects any measure in which distinct records are counted (number of visits, number of patients, number of CPT codes)
- SUM, MINIMUM, MAXIMUM, and AVERAGE are arithmetical, based on numbers that are meant to be totaled (charges, payments) and/or averaged (hemoglobin level, BMI)
Some numbers can be either counted or summed, depending on what we want:
| Patient #8284 | DOS 3/14/14 | Charge: $455 |
| Patient #9483 | DOS 4/7/14 | Charge: $50 |
| Patient #3347 | DOS 2/3/14 | Charge: $210 |
| COUNT of CHARGE: 3 SUM of CHARGE: $715 |
||
That is, we had three separate charges, but the charges in total were $715.
Other calculations on the same data set may give meaningful or bizarre responses:
| Patient #8284 | DOS 3/14/14 | Charge: $455 |
| Patient #9483 | DOS 4/7/14 | Charge: $50 |
| Patient #3347 | DOS 2/3/14 | Charge: $210 |
| SUM of PATNO: 21114 MINIMUM of DOS: 2/3/14 AVERAGE of DOS: 3/9/14 |
||
Without going into too much detail, be sure you have the LookAhead option checked for SUMs, COUNTs, and other calculations found in Group Headers, but unchecked in Group Footers. If not, you may get bizarre/incomplete results. To see whether LookAhead is checked or unchecked, right-click to inspect the settings of the DBCalc element.
Computed Variables
Sometimes there is a need to create a computed variable in a report; that is, the created variable depends directly on the content of other variable(s). “Computed variable” need not be limited to sums and averages; in fact, sometimes it’s as simple as personalized wording. Let’s say you are creating recall letters to send to the following patients:
|
Name |
DOB |
Sex |
| Katie | 5/8/2004 | F |
| David | 6/10/2013 | M |
| Lonnie | 11/18/1998 | M |
| Brianna | 2/16/2009 | F |
| Mary | 5/21/2010 | F |
And you would like to include in your letter a line of text that says:
It is very important for your [baby/child/teen] to be up-to-date on [his/her] checkups.
The first computed variable (we’ll call it “age bracket”) depends on the independent variable DOB; the second computed variable (the personal pronoun) depends on the independent variable Sex.
In our report, we might lay out the report with three Labels (static text) and two Variables (changing text) like this. First we create three Labels with the appropriate text:
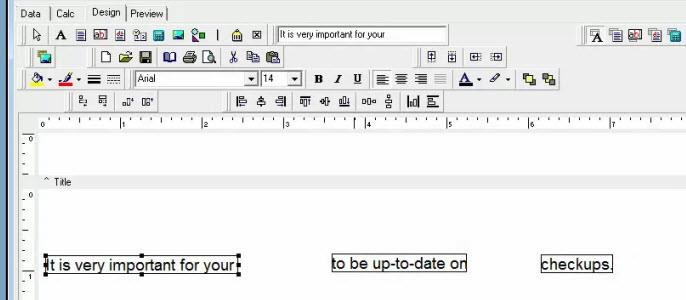
Then insert two the Variables (in the toolbar, it looks like a plain calculator) in between:

Now we want to set Variable1 to read “baby” if the child’s age is less than 1, “child” if the child’s age is between 1 and 12, and “teen” if the child’s age is greater than or equal to 13. Similarly, we want Variable2 to read “his” if Sex = M and “her” if Sex = F.
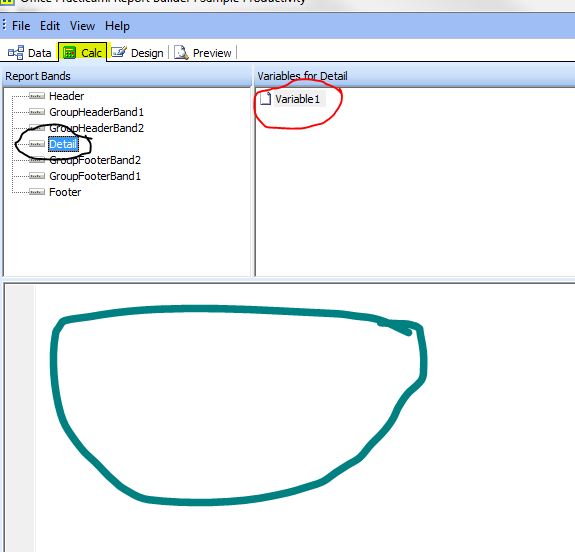
We set the variables’ programming by clicking to the Calc tab (highlighted yellow — in between the Data and Design tabs), then clicking the Report Band that contains the variable of interest (here, the Detail Band, circled black.) We select the variable of interest in the upper right pane (here, circled red), then add programming in the bottom pane below (here, indicated with a thick green circle.)
The programming language used here is called Delphi. An entire programming tutorial on Delphi is way beyond the scope of these tutorials, but here are some tips for Delphi:
- Each line of code should end with a semicolon.
- The value of the variable being programmed is set by the phrase Value := (note the colon before the equal sign.)
- To set the value of a variable from within another variable, you can use the construction Variable3.value := from any programming pane.
- You can use a plain equal sign = as part of an IF construction, but variable setting using an equal sign requires the construction := For example:
if Age = 18 then value := ‘You’re an adult!’
if Age = 17 then value := ‘Sorry, you’re still a kid.’
To set the “baby/child/teen’ variable calculation in our theoretical example, in the programming panel for Variable1 we enter:

To set the “his/her’ personal pronoun calculation, in the programming panel for Variable2, we enter:
IF REGISTER(‘SEX’) = ‘M’ then value := ‘his’;
IF REGISTER(‘SEX’) = ‘F’ then value := ‘her’;
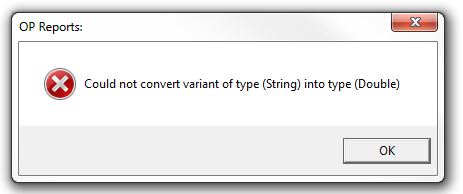
If there is an error in the calculation, the location and error type appears at the bottom left of the screen:

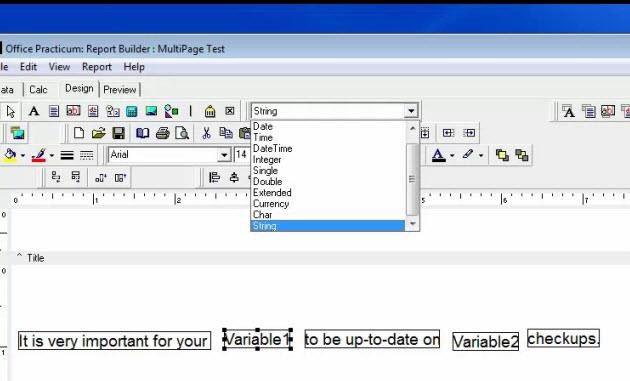
Be sure that your variable type is correct for the kind of computed variable you’re making. In both of these cases, we’re creating text, so we want the variable type to be String. But if we were creating a number, or a date, or a dollar figure, we’d want the variable type to be set accordingly in the Edit drop down:
It’s common to get run-time errors if the variable type is not set correctly in the Design tab.

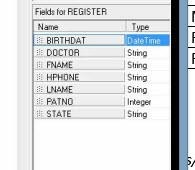
In the Calculations screen, typing all the reference data fields (like REGISTER[‘BIRTHDAT’]) can be tedious. The particular bracket/apostrophe format is also prone to typos. You can simply “grab” the data field you want from the Fields box on the right side of the Calculations screen, then drag it to the place you want to insert it. Mouse over the dotted grey square to the left of the name of the field you want to use, then drag it to the Calculations whitespace area.
If you like programming, you can create very elegant constructions of calculated variables.
Variable Resetting
Just as with Grouping, in which we might have several subtotals followed by a grand total, it’s important to think about how your variables should be reset. Do you want the calculation to start from scratch again at every line item? Then right click on the variable, select Timing, and choose Reset on: Traversal. Do you want the calculation to start from scratch at each Group? Within Timing, choose Reset on: Group Header or Group Footer, then in the dropdown below, select which Group you want it to reset on.
Variables can also be used as control structures, to hide or show pieces of your report on the fly.
Let’s say we have a form that has to indicate patient sex, M or F. The most straightforward way is to create a DBText that links to REGISTER.SEX, which will simply print M or F. But let’s say the Paperwork Minor Gods decree that we must have a form with the type:

….and we must check the appropriate blank with an X. One way to do this is to create two Labels, each consisting of an X, and placing them over the blanks. Each component in the report has a property called “Visible” which can be set to TRUE (to make it appear) or FALSE (to make it invisible). Let’s say Label1 is our male X and Label2 is our female X. We then instruct our variable (by right clicking on the Variable and choosing Calculations…) to show the left X and hide the right X if REGISTER.SEX = M and vice versa for REGISTER.SEX = F:
if REGISTER[‘SEX’] = ‘M’ then begin
Label1.Visible := true;
Label2.Visible := false;
end;
if REGISTER[‘SEX’] = ‘F’ then begin
Label2.Visible := true;
Label1.Visible := false;
end;
Notice that the variable itself is only a control structure; the variable itself has no value or content. Picture two windows, one facing north and one facing south, each covered with curtains that can be opened or closed. The curtains control the view (control structure), but they are not the landscape (the data), nor do they even “hold” the landscape like the window does (the variable).
Another example of a control-structure variable is illustrated in part four of Walkthrough #2, in which we show only insurance ID numbers that meet certain criteria.
You can even hide entire Bands in the report if they don’t meet certain criteria. You can manipulate the Band.Visible property depending on the value of other variables.