
Walkthrough Example #3: Making a School Allergy Form
Let’s make an Allergy/Anaphylaxis Action Plan for schools that can be printed from End User Reports.
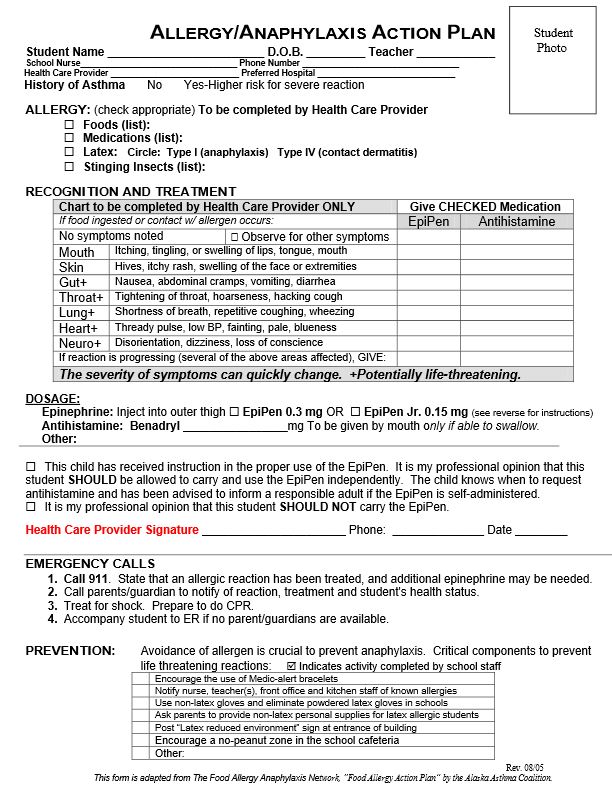
You can create a report like this (source: LABBB)
Part One: Importing the Form Image
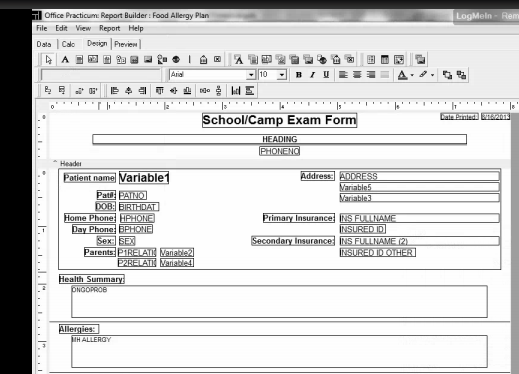
You can get a lot of this form using the School Camp Reports template that exists already in OP Reports. From within OP Reports, go to the SchoolCampReports folder and then right-click on the report called “General School Camp Form use to add tables.” From the popup, choose Design.
Now Save As your nascent report with a new name (“Allergy-Anaphylaxis Plan”)
Now pull up an image of the form you want to use. Get it as large/high-resolution as you possibly can, then make a screenshot using your favorite free screenshot software. Getting a large image and shrinking it down is better than getting a tiny image and trying to blow it up to the right size; the latter often looks too blurry to use.
It is OK to get the screenshots in pieces, i.e. the top half of the form in one jpg and the bottom half of the form in another JPG. In fact, if you can get larger/higher-res JPGs doing it this way than a single JPG, do that.
Once you have your JPG(s), add them to the report. In the Design view, choose the Image icon on the left (between the blue-green calculator and the circle/square/triangle group):
![]()
Drag it somewhere on the page. Then right-click on the resulting little Image box to set the settings:
- Set Picture… to the screenshot of the form you just did
- Check Maintain Aspect Ratio
- Check Stretch.
Then drag the corners until the image expands over the width of the page:
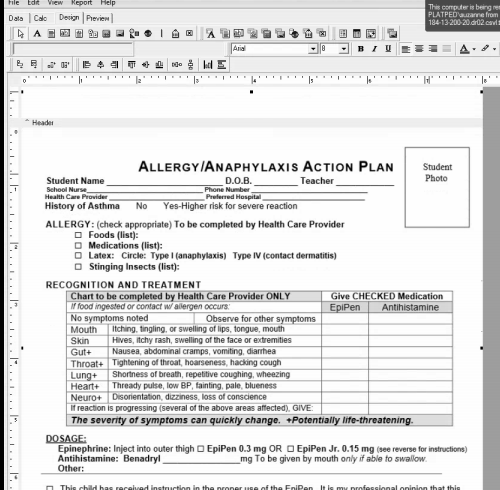
….then click Send to Back. Now you have a big messy mixture of the form image plus the variable fields:
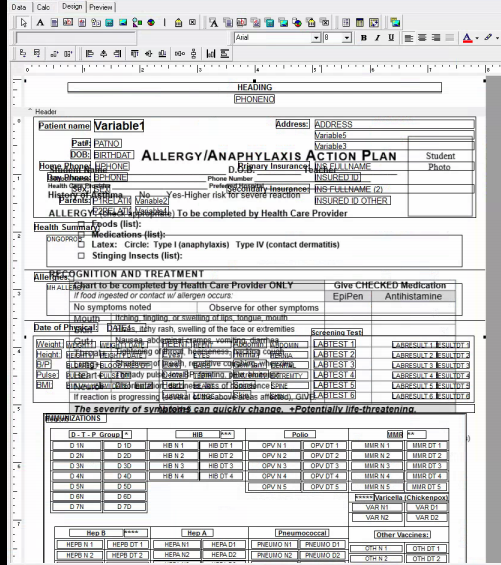
…but you can start cleaning up the mess by deleting all the fields you won’t need, like the vaccine information (you don’t need that on an allergy/anaphylaxis form.)
Once you’ve deleted all the fields you don’t need, save your work.
Part Two: Cleaning It Up and Testing The Form
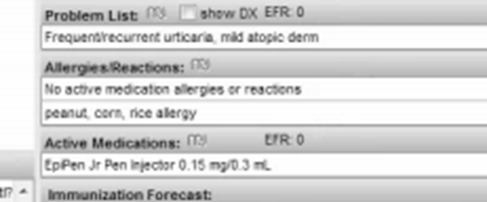
To see how your form is shaping up, find an allergic patient (or a Testpatient) in your practice who has a food or other non-medication allergy listed. This kid is basically allergic to Thai food
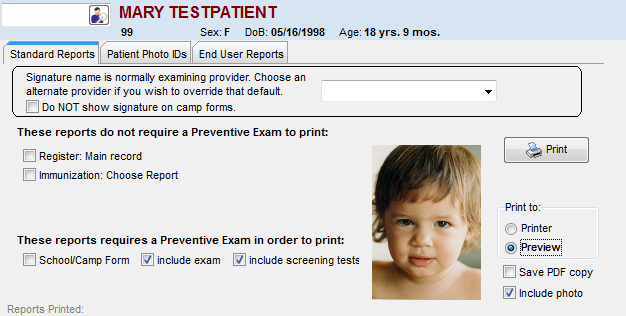
Open his chart in OP; test your report from within OP by typing Ctrl-M, making sure Print to Preview is selected, then clicking on End User Reports and choosing your new report.
(You always want to test End-User Reports from within OP. As long as you’ve saved your draft report in OP Reports, OP’s End User Reports will pull the most current version of what you’re testing.)
Before we’ve cleaned it up, the form with Mary Testpatient’s information populated in it looks like this:

Now you just have to move the fields you want to keep to the right spots on the form. Go back to the Design tab of OP Reports and drag your name, date, etc. fields into the spots on the form. Work back and forth between Design mode and End User Reports until you have most of the basic stuff in place.
Part Three: Adding Some Programming
Now you have to make some decisions about your form. What do you want OP to compute? What can be filled in “permanently?” What will need to be written in by hand? What can be left blank?
For example:
- Do you want it to fill in “school nurse” and “teacher”? If so, where is it going to get that information from OP? (Even when I do these forms by hand, I leave those fields blank.)
- For “health care provider” and signature, I’m going to make it always print the child’s PCP, and use the PCP signature. You could also have it assigned on the fly
- For “health care provider phone” (at bottom), I can “permanently” print 931-707-8700 since all 6 of us at our practice have that phone number.
- How do you want the check mark table filled out?
- For the date at the bottom, do you want today’s date (i.e. the date you’re printing the form) or the date of the last checkup?
- For the “should carry/should not carry Epipen” question – do you want to make an individual judgment, or do you want it to say “yes” for all kids ages 10+ and no for kids age 9 and younger?
To compute drug doses, we’ll use the following logic:
- Benadryl will be 1.25 mg/kg/dose, based on the most recent weight
- EpiPen Jr (if the child’s most recent weight was <25 kg) or EpiPen (if the child’s most recent weight was >= 25 kg)
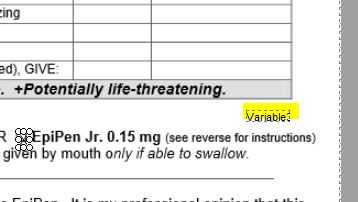
Click on the Variable tool (small calculator icon) and place it in the Benadryl slot on the form.
Now, right click on the Variable you just placed and choose Calculations… Set the value of this value to be the last weight, in kg, times 1.25:
Value := (physical[‘WEIGHT1’] / 2.2) * 1.25;
Notice the := and the ; at the end. Perfect – except, if we have a fat kid, the order will be to give 192 mg of Benadryl! So we want to set an upper limit of 50 mg:
Value := (physical[‘WEIGHT1’] / 2.2) * 1.25;
if value > 50 then value := 50;
And we want to not give orders for 29.0825 mg, so we’ll round the calculation to the nearest whole number:
Value := (physical[‘WEIGHT1’] / 2.2) * 1.25;
value := round(value);
if value > 50 then value := 50;
Now we will have the report calculate whether the kid should get Epipen or Epipen Jr. You could look in the Rx section to see what the kid has been prescribed most recently, but this way is actually a little easier.
Start by putting X’s in BOTH the Epipen and Epipen Jr box usign the Label tool. Make sure it lines up with the box in Preview mode. You can change fonts and font sizes if you need to.
![]()
The X on the left is “Label1” and the X on the right is “Label2” (you can see what identities OP Reports has assigned them by clicking on an element, then looking in the very lower left corner of the OP Reports screen. Here Label2 is highlighted.

Now add a dummy variable. It won’t actually compute a numeric value – but it will turn Label1 and Label2 off and on, or on and off, respectively, depending on the child’s weight.
depending on the weight of the kid. Here is Variable3, just tucked away to the right.
Now we add some calculations to Variable3:
if physical[‘WEIGHT1’] >= 55 then Label1.Visible := true;
if physical[‘WEIGHT1’] >= 55 then Label2.Visible := false;
if physical[‘WEIGHT1’] < 55 then Label1.Visible := false;
if physical[‘WEIGHT1’] < 55 then Label2.Visible := true;
(Remember that the OP field WEIGHT1 stores a child’s weight in lbs, not kg, so we need thresholds of 55 lbs, rather than weights of 25 kg, to determine whether the child should get EpiPen or EpiPen Jr.
You can make this more elegant with if/then/else constructions, but it works just fine without.